
Run the appointment book
Book, check in, check out and rebook clients from one screen, with a column for every room, chair or provider.
Free forever Not a trial. No card, no contract, unlimited staff. Card payments cost 3.9% + 30¢. Our promise →
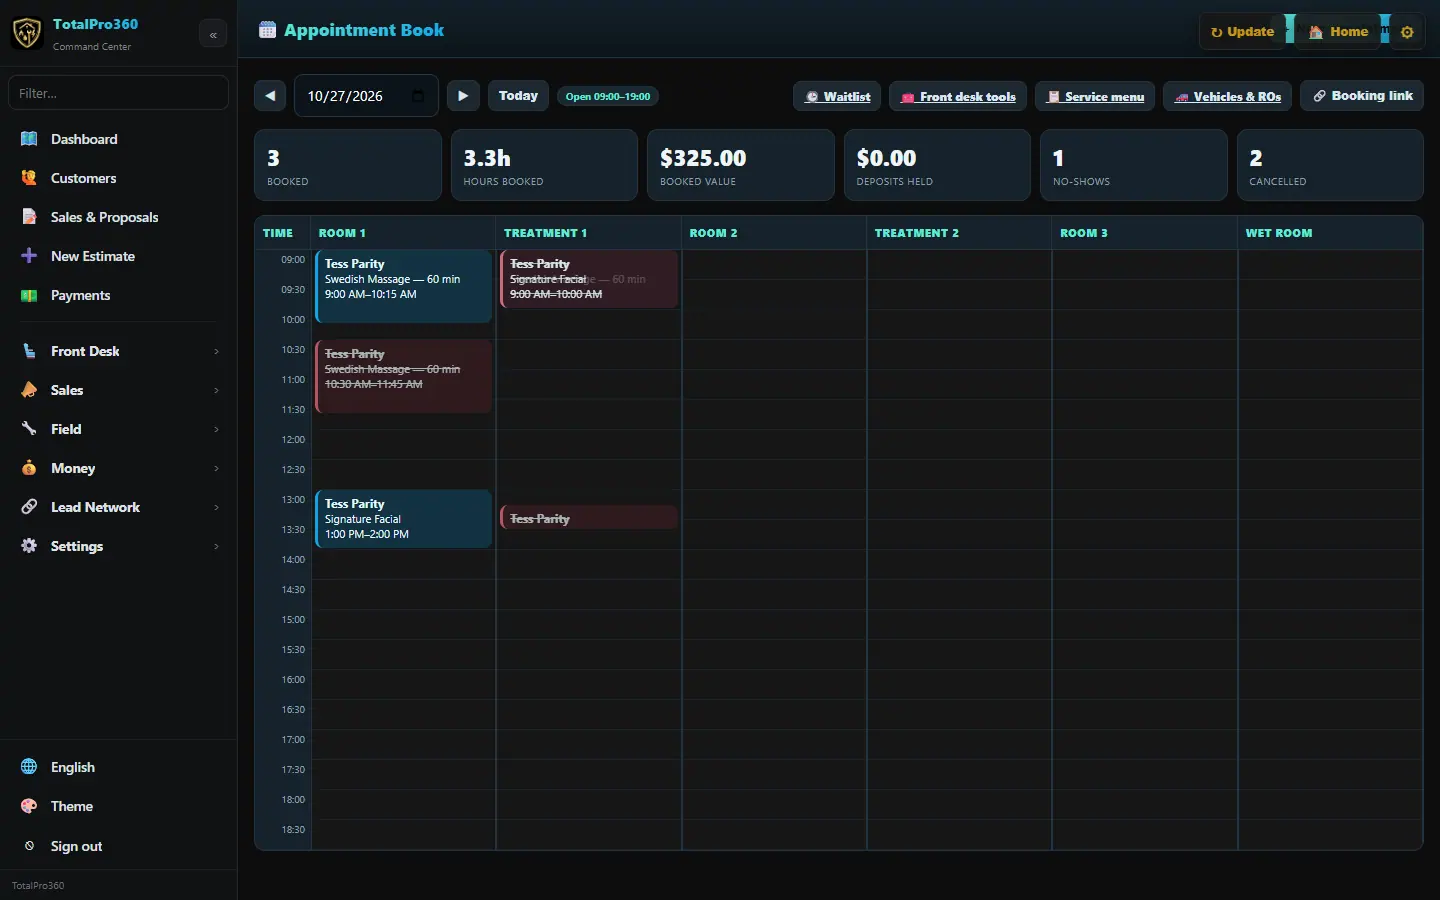
Step 1: Open the book
Go to Front Desk → Appointment Book. Each column is a provider, with their staff card at the top: their photo or initials in their color, how many appointments they have and the hours booked. Click Staff or Rooms (Chairs, Bays or Stations, depending on what you set up) to switch the columns; the book remembers your choice on that computer. Appointments keep their provider’s color down the left edge, so you can tell who’s who in the rooms view too. The cards at the top show what’s booked today, hours booked, booked value, deposits held, no-shows and cancellations. Use the arrows, the date picker or Today to move around.
The day scrolls in its own pane with the staff cards and times pinned in place. Today opens about an hour before now, with a red now line across every column (in your business’s time zone); other days open at the first appointment. Today always jumps back to now.
Step 2: Use the staff cards
Right-click a staff card (on an iPad, press and hold it), or click the round photo, to set that provider’s Color, a shorter Display name or their Photo. The same card shows on the team list and in the provider app.
While someone is on the clock, their card says on the clock and has a red ⏱ Clock out button, and the right-click menu has Clock out… too. Both open the clock-out dialog from the time tracking guide.
Step 3: Book an appointment
Click + New appointment (or an open slot). Pick the Service, the Date and who it’s With, then choose from Available times, which respect hours, schedules and rooms. Enter the client’s name, phone and email, add any add-ons, and click Book it.
Step 4: Find the client first
Start typing in the Client box. Your clients who match the name, phone or email show up as you type; pick one and the visit goes on their record (you’ll see ✓ Existing client). Choose + New client only when they aren’t there yet.
If you type a new name and the phone, email or name matches someone you already have, the book asks before it books: Use that client, or No, this is a new client. That way one person never ends up as two.
Step 5: Who gets “Anyone available”
The With list only shows people who do the service you picked. Leave it on Anyone available and the book gives the visit to whoever is free with the fewest appointments that day, so the work is shared out (a tie is picked at random). Online bookings work the same way.
Step 6: Move an appointment
Grab an appointment and drop it higher or lower to change the time, or in another column to give it to another provider, chair or room. It keeps its length and snaps to your booking slot size, and a dashed outline shows where it will land. To move it to another day, drop it on the ◀ or ▶ day arrow, or use Move to….
If the new time is outside your hours or the provider’s hours, overlaps another appointment, needs a chair or room that’s taken, or goes to a provider who doesn’t usually do that service, you’ll see why and can pick Book anyway or Cancel. Checked-in, in-progress, completed, canceled and no-show appointments can’t be moved.
Step 7: Undo a move and tell the client
After a move, Undo shows for 8 seconds and puts back the date, time, provider, chair or room, and status. Tell the client is ticked if you turned on Tell customers when their appointment time changes under Automatic Messages, and you can change it for this one move. If you undo, the client isn’t told anything.
Step 8: Move on an iPad, a phone or the keyboard
On an iPad, press and hold an appointment for about half a second until it lifts, then drag it. A quick swipe still scrolls. On a phone, press and hold an appointment in the list for Move to….
Right-click an appointment (or focus it and press M) for Move to…, which asks for the provider, chair or room, date and start time. From the keyboard, Tab to an appointment, press an arrow key to pick it up, use the arrows to move it, then press Enter to drop it or Esc to cancel.
Step 9: Take a deposit or a card
Open the appointment and click 💳 Take deposit if the service needs one, or Client adds a card to text them a secure link.
Step 10: Check the client in
When they arrive, open the appointment and click ✅ Check in. If the service has an intake or consent form, use Copy form link or Text it to the client before the visit.
Step 11: Check out and take payment
Click 💵 Check out. Add retail by scanning a barcode or searching, pick a Tip percentage for the named provider, apply a Gift card or a Discount, then Take payment.
Step 12: Rebook before they leave
Click 🔁 Rebook to put the next visit on the book while the client is still at the desk.
Step 13: Handle no-shows and cancellations
Use 🚫 No-show or Cancel booking. If you’ve set a no-show or late-cancel fee in Front Desk Tools, the app offers to charge the card, invoice it or waive it.
Step 14: Share your booking link
Click 🔗 Booking link to copy the link clients use to book themselves. Put it on your website, social profiles and texts.
Step 15: Find any appointment or client
Type a name, phone number, email, service, staff name or confirmation number in 🔎 Search appointments or clients and press Enter, or click 📋 All appointments. The list shows every appointment, newest first. Use All, Upcoming, Past, Cancelled or No-shows to narrow it, and Next ▶ for more. Clients that match show at the top; click one to open their profile. Click an appointment to open it.
Every appointment shows how and when it was booked under Booked: Online booking, Front desk (with who booked it), From the waitlist or Rebooked at checkout, with the date and time in your business’s time zone.
Still stuck? Tell us what you were trying to do and where you got stuck. A screenshot helps.
Your ticks are saved in this browser only. Updated October 2026.
Questions about this
Do clients get reminders?
Yes. Booking confirmation and reminder texts are part of the free software.
Who can move appointments?
Owners, managers and front desk staff. A provider can move appointments only if you’ve given them permission to reschedule in Settings → Users & Permissions.
Can I save a client’s card when they book online?
Not yet; saving a card at booking is coming soon. Today you can take a deposit, or text the client a link to add a card.